- 0330 024 9093
- (Mon-Sat 8.30am-5.30pm)

Electric Oven Installation & Built In Oven Installation
The following document provides advice on the installation of ovens and identifies the common mistakes made by installers, which can lead to both the customer and installers incurring additional and unnecessary costs.
Single Ovens Installation Advice and Guide
Single ovens must be installed in an appropriate cabinet that is provided with adequate ventilation to ensure the correct operation of the appliance. Legislative requirements dictate that any cabinet must be able to withstand a temperature of 90C. In practice, the quality of cabinetry and furniture doors varies greatly across manufacturers and this cannot be guaranteed due to variations in production techniques.
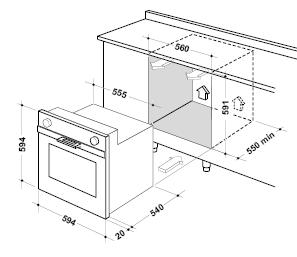
Typically, for a built-under oven, ventilation is provided in the design of the cabinet, although it may be necessary to cut additional ventilation holes depending on the recommendations in the instructions provided. In all single oven installations, the top rail of the housing should be removed to ensure a free flow of air around the product. The requirements for a typical oven are shown below: -
Ensure there is a free flow of air around the product and that air can enter the cabinet. (As indicated on the diagram by the arrows)
It is not uncommon for appliances to cut out during use when adequate ventilation is not provided.
Built-Under Double Ovens Installation Advice and Guide
These products are designed to be installed in the space between two units in a gap of 600mm wide and 715-720mm tall. The recommended method of installation is without a housing unit, as the products are supplied with all the required fixings and supports
It is also possible to install these products into a standard oven housing unit, with the shelf removed. In these circumstances, it is important to remember that the oven needs to be supplied with adequate free air flow to ensure that the cooling system can operate correctly.
Important!
Always consider the hob that is to be fitted before deciding on these products, as there are some compatibility issues with any hob whose depth below worktop level is greater than 40mm (typically, issues are most commonly associated with gas on glass, ceramic and induction hobs).
Double Ovens & Built-in Single Ovens Installation Advice and Guide
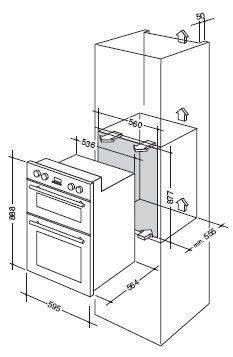
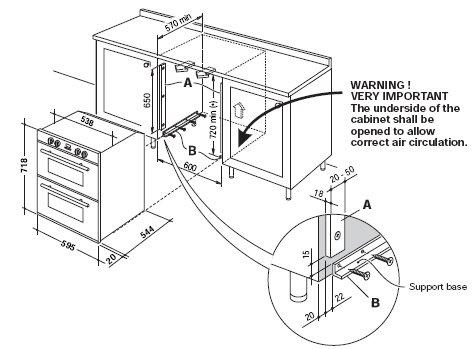
As with any oven, the ventilation provided ensures that the temperature of adjacent furniture and allows the cooling system to work correctly. With built-in products the main consideration is free air flow up an open channel at the rear of the housing. Additionally, a vent should be provided in the unit run to allow air in. The diagram below shows a typical double oven installation requirement, although for a single oven it is exactly the same: -
The open channel at the rear is clearly shown. For the correct operation of the appliance it is important that the top of the housing unit is not blocked off. A channel depth of 40-50mm is normal with most units.
Note that if there is insufficient ventilation it may take much longer for the appliance to cool down after cooking and may lead to issues with condensation.
Gas Ovens Installation and Guide
Gas ovens should be installed following the same guidelines as for electric single ovens, but additional factors need to be taken into account. These are:
- The flexible gas hose used to connect the appliance to the gas supply must hang freely after the appliance has been installed.
- The hose connection bayonet must be accessible after installation so that the appliance can be disconnected from the supply by the customer.
- In many cases, the oven may need to be set-up – especially after conversion to LPG. It is the responsibility of the installer to commission the appliance correctly following all requirements documented in the instruction manual (low rate gas flow, aeration, etc).
Failure to correctly install any gas appliance could lead to the installation being reported to RIDDOR under the requirements of statute legislation.
Further information is available in the HSC document, "Safety in the installation and use of gas systems and appliances", ISBN: 0-7176-1635-5. This document is the practical advice covering the installation of appliances in line with the "Gas Safety (Installation and Use) Regulations".
Electrical Supply Advice
Most ovens are intended to be connected to permanent, fixed wiring either through a 13A fused spur or a dedicated cooker point. In all cases, the instructions supplied with the product provide detailed requirements and these should be followed.
The isolation switch should always be accessible after installation.
A qualified electrician should connect any appliance to the mains supply, using an appropriate cable (information on rated input is shown on the rating plate and in the instructions) and the installation needs to be compliant with any building or safety regulations currently in force. If more than one appliance is to be connected to a single supply circuit then each appliance must be protected by an appropriate fuse.
Other Considerations
The appliance should be securely fitted to the cabinet using appropriate screws; otherwise, the appliance could move in use which can casue damage to adjacent furniture and lead to increased noise or vibration in use. If the appliance is not secured, there is a risk of the appliance tipping forward when the door is opened.
Always install the products centrally in the housing and ensure that there is a clearance of 4mm between the edges of the oven and any adjacent furniture doors. Note that de-lamination of adjacent doors is more likely to be the result of product misuse or poor manufacturing processes and does not indicate a fault of the oven if there is no complaint about general cooking performance.
When handling ovens, care should be taken to ensure the lower trim is not damaged before introducing it into the cabinetry. All ovens should be supported to protect the lower trim, as shown: -

If the trim is damaged, it may prevent the correct operation of the door and can cause the door glass to shatter when the door is opened. Damage to the appliance caused by poor handling is not covered under the warranty.
Important!
Never lift an oven by the handle or knobs, as this can lead to damage to the door or controls.